The Meta Quest 3 is a powerful VR headset offering a wide range of features for casual users and developers. However, if you’re trying to enable USB debugging on your Meta Quest 3 and it’s not showing up, it can be frustrating. USB debugging is essential for developers who want to test apps, sideload content, or access advanced features on their devices. In this comprehensive guide, we’ll walk you through the steps to troubleshoot and resolve the issue of USB debugging not showing up on your Meta Quest 3.
What is USB Debugging and Why is it Important?
USB debugging is a feature that allows your Meta Quest 3 to communicate with a computer using the Android Debug Bridge (ADB). This is particularly useful for:
- Sideloading apps: Installing apps that are unavailable on the official Meta Store.
- Testing and development: Debugging and testing VR applications.
- Advanced customization: Accessing hidden features or modifying system settings.
If USB debugging isn’t working, you may be unable to perform these tasks. Let’s explore solutions to get it working again.
Read More: How to Resolve the USB Update Mode Issue on Meta Quest 3s? Fixed
Why USB Debugging Might Not Show Up on Meta Quest 3?
Before we jump into the fixes, it’s important to understand why USB debugging might not appear on your Meta Quest 3. Common reasons include:
- Developer Mode is not enabled: USB debugging is part of Developer Mode, which must be activated first.
- USB connection issues: A faulty cable or port can prevent the device from being recognized.
- Missing ADB drivers: Your computer might not have the necessary drivers to communicate with the Meta Quest 3.
- Software glitches: Bugs or outdated software can cause USB debugging to malfunction.
- Permission prompts not appearing: The headset might not be showing the “Allow USB debugging” prompt.
Now, let’s explore the step-by-step solutions to fix these issues.
Step 1: Enable Developer Mode on Meta Quest 3
Since USB debugging is part of Developer Mode, you need to enable it first. Here’s how:
- Open the Oculus App:
- Launch the Oculus app on your smartphone.
- Make sure your Meta Quest 3 is connected to the app.
- Navigate to Developer Mode:
- Go to Menu > Devices and select your Meta Quest 3.
- Scroll down and find the Developer Mode option.
- Enable Developer Mode:
- Toggle the switch to enable Developer Mode.
- Restart your Meta Quest 3 to apply the changes.
Step 2: Check Your USB Connection
A faulty USB cable or port can prevent your Meta Quest 3 from being recognized by your computer. Follow these steps to ensure a proper connection:
- Use a High-Quality USB Cable:
- Use the original USB-C cable that came with your Meta Quest 3 or a high-quality alternative.
- Avoid using cheap or damaged cables.
- Test Different USB Ports:
- Try connecting the cable to different USB ports on your computer.
- If possible, use a USB 3.0 port for faster data transfer.
- Check for Connection Notifications:
- When you connect your Meta Quest 3 to your computer, a notification should appear in the headset.
- Put on the headset and check for any prompts.
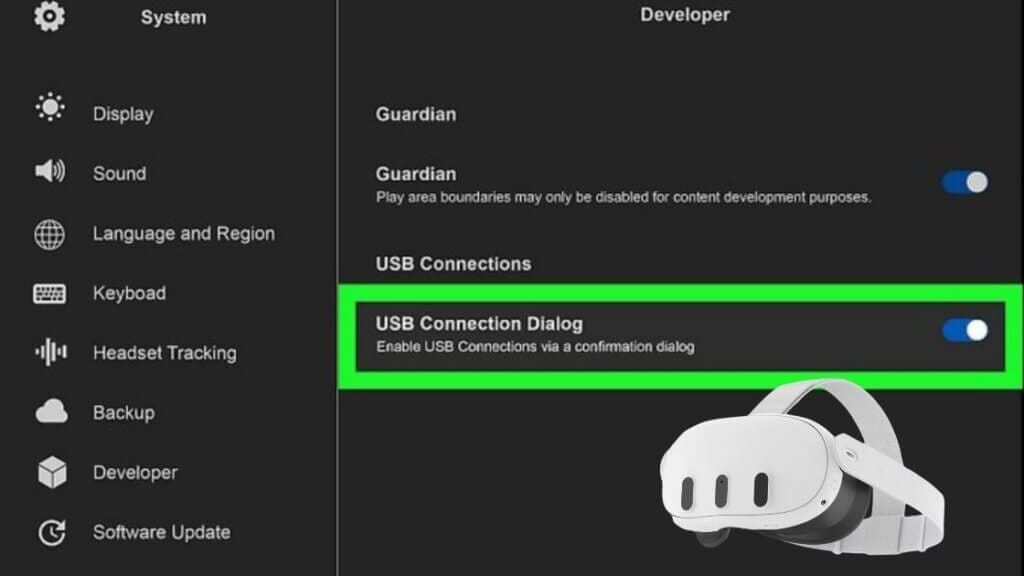
Step 3: Allow USB Debugging on Your Meta Quest 3
When you connect your Meta Quest 3 to your computer for the first time, you should see a prompt in the headset asking if you want to allow USB debugging. Here’s how to handle it:
- Put on the Headset: Wear your Meta Quest 3 and look for any notifications.
- Allow USB Debugging: If a prompt appears, select Allow or Always Allow, this will enable USB debugging for the current session or future connections.
- Check the Connection: After allowing USB debugging, check if your computer recognizes the device.
Step 4: Install ADB Drivers on Your Computer
If your computer doesn’t have the necessary ADB drivers, it won’t be able to communicate with your Meta Quest 3. Here’s how to install them:
- Download ADB Tools: Visit the official Android Developer website and download the latest version of ADB tools.
- Install ADB: Extract the downloaded files to a folder on your computer, open a terminal or command prompt and navigate to the folder where ADB is installed.
- Test the Connection: Run the command
adb devicesin the terminal. If your Meta Quest 3 is listed, it means the connection is successful.
Step 5: Update Your Meta Quest 3 and Oculus App
Outdated software can cause USB debugging to malfunction. Ensure both your Meta Quest 3 and the Oculus app are updated to the latest version.
- Update Meta Quest 3: Go to Settings > System > Software Update.
- Check for updates and install them if available.
2. Update the Oculus App:
- Open the app store on your smartphone (Google Play Store or Apple App Store).
- Search for the Oculus app and update it if necessary.
Step 6: Re-enable Developer Mode
If Developer Mode was already enabled but USB debugging still isn’t working, try disabling and re-enabling it:
- Disable Developer Mode: Go to the Oculus app and toggle off Developer Mode.
- Restart Your Meta Quest 3: Power off your headset and turn it back on.
- Re-enable Developer Mode: Go back to the Oculus app and toggle on Developer Mode again.
Step 7: Perform a Factory Reset (Last Resort)
If none of the above steps work, you may need to perform a factory reset. Note: This will erase all data on your device, so make sure to back up any important files.
- Go to Settings: Navigate to Settings > System > Factory Reset.
- Confirm the Reset: Follow the on-screen instructions to reset your Meta Quest 3.
- Set Up Your Device Again: After the reset, set up your Meta Quest 3 and try enabling USB debugging again.
Step 8: Contact Meta Support
If you’ve tried all the steps above and USB debugging still doesn’t show up, there may be a hardware or software issue with your device. In this case, it’s best to contact Meta Support for further assistance.
Conclusion
USB debugging is a crucial feature for developers and advanced users of the Meta Quest 3. If it’s not showing up, the issue can usually be resolved by enabling Developer Mode, checking your USB connection, or updating your software. By following the steps outlined in this guide, you should be able to fix the problem and get back to developing, testing, or customizing your Meta Quest 3.
If you found this guide helpful, feel free to share it with others who might be facing the same issue. And if you have any questions or additional tips, leave a comment below! Happy debugging! 🎮🚀
FAQs
1. How do I enable USB debugging on Meta Quest 3?
Go to Settings → System → Developer Mode (enable it if disabled). Then, toggle USB Debugging on.
2. How to enable debug mode on Quest 3?
Enable Developer Mode in the Meta Quest mobile app (Headset Settings → Developer Mode). Then, in the headset, go to Settings → System → Developer Mode and turn it on.
3. How to activate ADB on Quest 3?
First, enable Developer Mode and USB Debugging (as above). Connect your Quest 3 to a PC via USB and use ADB commands (e.g., adb devices) to verify the connection.
4. How can I find USB debugging?
After enabling Developer Mode, go to Settings → System → Developer and toggle USB Debugging on.