
18 Beginner Tricks for the Meta Quest 3S: The Meta Quest 3S VR headset is an incredible device that opens up new worlds of immersive entertainment and productivity on a budget. However, with so many features packed into the headset, it can feel overwhelming for beginners. To help you get started and make the most of your device, we’ve compiled 18 essential tips and tricks for the Meta Quest 3S.
Whether you’re exploring virtual reality for the first time or upgrading from a previous model, these tips will enhance your experience and ensure you’re using the headset to its fullest potential.
Read More: Protect Your Meta Quest 3S with KIWI Design Free VR Lens Guard – Worth $14.99
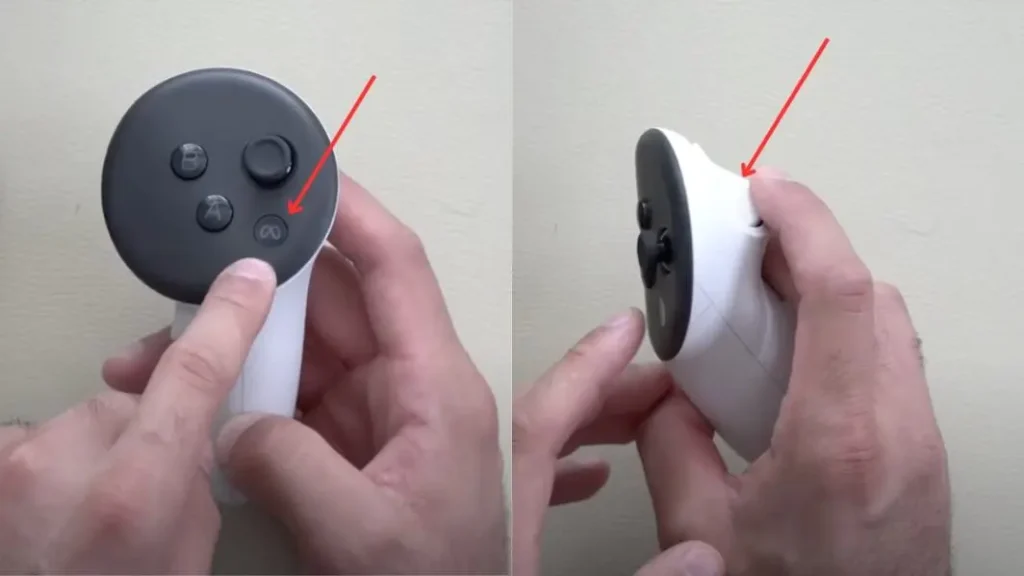
1. How to Take Screenshots or Capture Videos Using the Controller?
Capturing memorable moments in your VR experience has never been easier with the MQ3S. You can take screenshots or start screen recordings with a few simple button presses.
Here’s how:
- For Screenshots:
- Simply hold down the Meta button and the trigger button on your right-hand controller.
- This will instantly capture a screenshot of your VR environment. It’s great for saving important scenes or cool discoveries.
- For Screen Recording:
- To record your screen, hold down the trigger button and long-press the Meta button on your right-hand controller.
- As soon as you hold it, the screen recording will start. You’ll be able to record everything happening in the VR world, which can be useful for tutorials, game walkthroughs, or sharing experiences with friends.
- Using Meta AI:
- You can also use Meta AI for voice-activated commands. Double press the Meta button to activate Meta AI, then simply give a verbal command like, “Take a screenshot” or “Start recording” to do these actions hands-free.
2. Adjust Your IPD (Interpupillary Distance) with 3 Settings
The Meta Quest 3S comes with an upgraded feature to adjust your IPD (Interpupillary Distance). This allows you to fine-tune the distance between the VR lenses for a clearer and more comfortable viewing experience.

Unlike its predecessor, the MQ3S gives you three IPD settings, which you can adjust easily:
- How to Adjust:
- Simply slide the lens adjustment slider at the bottom of your headset.
- Move it until you feel the sharpest and most comfortable view.
- Extra Tip:
- If you slide it slowly, the lenses will adjust between two settings. Play around with the positions to find the one that works best for your eyes.
This feature will help you get the most out of your VR experience, especially during extended sessions when comfort is key. (18 Beginner Tricks for the Meta Quest 3S)
3. Understanding the Physical Buttons at the Bottom of the MQ-3S
At the bottom of the Meta Quest 3S, you’ll find two important physical buttons. Here’s what they do:
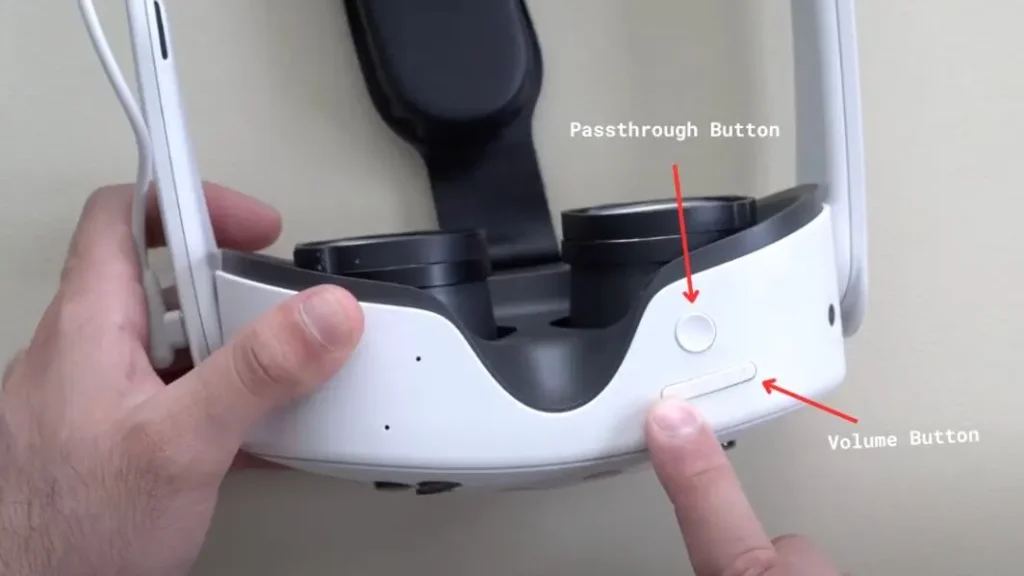
- Volume Button:
- The longer rectangular button is the volume button.
- Use this to adjust the sound level on your Meta Quest 3S.
- Passthrough Button:
- The second button is your ‘Passthrough’ button.
- Tapping this button will switch the VR environment to a Pass-Through view.
- This allows you to see the real world around you while still wearing your headset. It’s particularly useful when you need to navigate or check your surroundings without taking off the headset.
- Enable Passthrough:
- To use this feature, make sure you have enabled the Passthrough option in your settings:
- Go to Settings > Physical Space > Passthrough.
- Toggle the option for ‘Double Tap to Passthrough’ to make it more convenient to switch between VR and real-world views.
- To use this feature, make sure you have enabled the Passthrough option in your settings:
4. Protect Your Lenses from Sunlight and UV Rays
One important thing to keep in mind when using your Meta Quest 3S is to avoid exposing the headset lenses to direct sunlight or UV rays. Here’s why:
- Why It’s Important:
- UV rays and sunlight can damage the lenses of your VR headset over time, causing deterioration of the visuals or the performance of your device.
- How to Protect Your Lenses:
- Always store your headset in a cool, dry place away from direct sunlight.
- Consider using a lens cover or case when you’re not using the device to further protect it from the sun.
By taking these simple precautions, you can extend the life of your Meta Quest 3S and enjoy a clearer, more vibrant VR experience.
5. How Many Windows Can You Open Up in Meta Quest 3S?
The MQ3S allows you to multitask in a virtual environment by opening up to 3 windows at once. This can be useful for gaming, watching videos, or even browsing the web while engaged in other activities. Here’s how to manage your windows:
- How to Open and Adjust Windows:
- You can manually open up to 3 windows by navigating through your VR interface.
- To adjust their positions, grab the corners of each window and resize them just like you would on a desktop computer or laptop.
- Quick Adjustment:
- If you want to adjust the layout of all your windows at once, long-press the Meta button on your right controller.
- This will automatically adjust all 3 windows to the best fit for your viewing area.
- Full-Screen Mode:
- On the top corner of the browser window, you’ll find a new button to toggle full-screen mode.
- This is especially useful when watching videos on platforms like YouTube, giving you a more immersive, cinema-like experience. (18 Beginner Tricks for the Meta Quest 3S)
6. How to Enable Spatial Audio on Meta Quest 3S?
To improve your VR experience, you can enable spatial audio, which creates a more realistic and immersive sound environment. This feature adds depth and directionality to the sounds you hear, making it feel like they are coming from specific places in the virtual world.
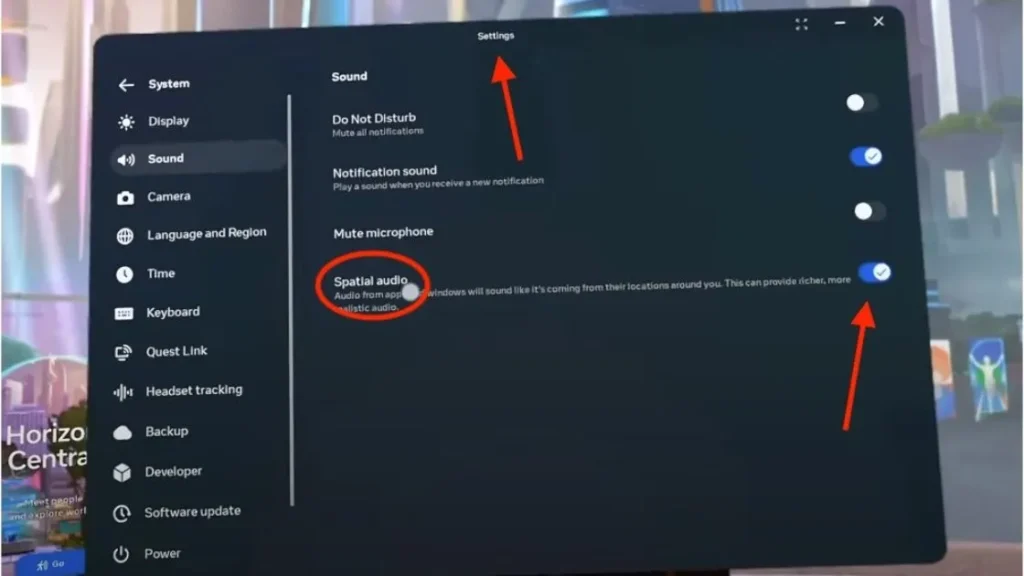
- How to Enable Spatial Audio:
- Open the Settings menu on your Meta Quest 3S.
- Navigate to System > Sound.
- Toggle the Spatial Audio option by sliding the button to the right. This will activate the feature and enhance your sound experience.
- Why You Need Spatial Audio:
- Spatial audio improves immersion in games, videos, and virtual environments, as it makes sounds feel more natural and directional.
- It’s perfect for games that require awareness of your surroundings, like action games or escape room experiences.
7. How to Watch Netflix or Hulu on Meta Quest 3S?
The MQ3S gives you the ability to stream popular services like Netflix and Hulu right from your VR headset. Here’s how you can enjoy your favourite shows and movies:
- Step-by-Step Instructions:
- Open the web browser on your Meta Quest 3S.
- In the search bar, type “Netflix” or “Hulu” and press Enter.
- You will be redirected to the official website of the streaming service.
- Log in to your account and start streaming directly from the browser.
- Bonus Tip:
- On the home page of the browser, you can also find some free online games to play, adding more entertainment options right from your Meta Quest 3S headset!
With this trick, you can turn your VR headset into a portable cinema, enjoying your favourite shows and movies anytime, anywhere.
8. How to Customize Your VR Environment?
Personalizing your VR environment can make your Meta Quest 3S experience feel even more unique and tailored to your style. Here’s how to change and customize your VR environment:
- Changing Your Environment:
- Go to System Settings on your MQ3S.
- Select the Personalize option.
- You will see a list of available environments. Choose the one you like and click on Apply.
- Your VR environment will change instantly, giving you a fresh, new setting to enjoy.
- Interactive Objects:
- You can also choose to enable or disable interactive objects in your VR environment.
- Go to Personalize > Interactive Objects, and toggle the setting according to your preference.
- Changing Themes:
- The Personalize page also lets you modify the theme of your VR environment, allowing you to adjust colours and overall design to your liking. (18 Beginner Tricks for the Meta Quest 3S)
With these customization options, you can create the perfect atmosphere to suit your mood or activity.
9. How to Enable Meta AI Features and Use an External Microphone?
Meta AI is a powerful tool that can assist you while navigating your MQ3S. If you want to enable Meta AI as your assistant or connect an external microphone for clearer communication, follow these steps:
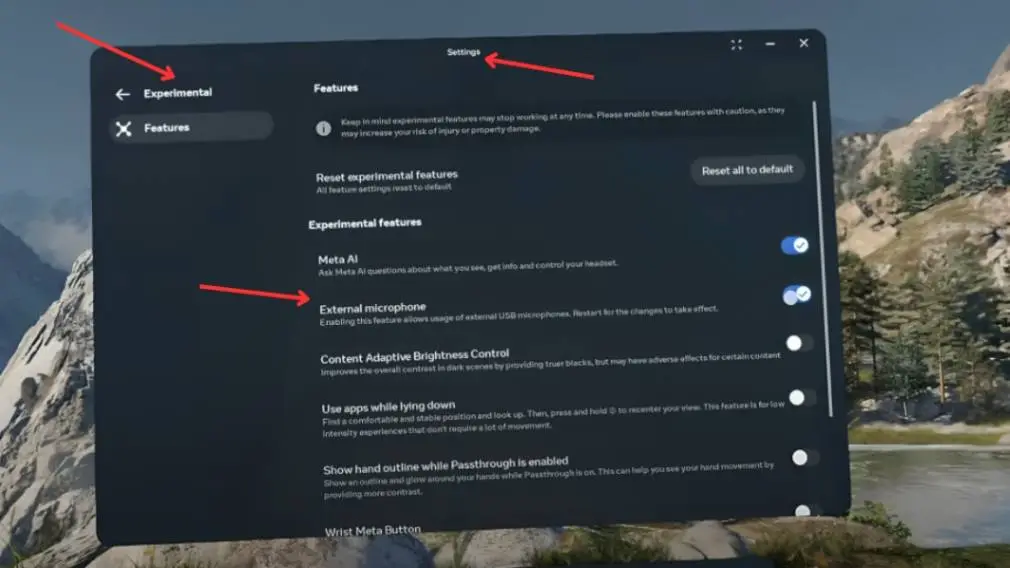
- Enable Meta AI:
- Go to the Settings page.
- Click on the Experimental tab.
- From here, you can enable the Meta AI features as an assistant to help with tasks, commands, or navigation in your VR environment.
- Connecting an External Microphone:
- In the Experimental tab, you will also see an option to connect an external microphone.
- Plug in a compatible microphone to the USB port on the Meta Quest 3S.
- Enable it from the settings to improve voice clarity and make your conversations more natural.
Meta AI and external microphones can help elevate your virtual interactions, making the MQ3S even more responsive and user-friendly.
10. How to Sync Media Between MQ3S and Your Mobile Device?
If you want to view all your VR-captured media (screenshots, videos, etc.) on your phone, syncing it with the Meta Horizon mobile app is simple and easy:
- Syncing Your Media:
- Go to Settings on your Meta Quest 3S.
- Navigate to Camera settings.
- Enable the option for ‘Sync media to Meta Horizon mobile app’.
- Bonus Feature:
- You can also toggle the ‘Video capture indicator’ option to show or hide a visual indicator when recording videos.
After enabling this, all your captured media will be available to view on the Meta Horizon mobile app, making it easy to share your experiences or save them for later.
11. How to Use Quest Link to Connect to Your PC?
If you want to take your MQ3S experience to the next level and play PC VR games or access other PC-based content, you can connect your headset to a computer using Quest Link. Here’s how:
- Step-by-Step Instructions:
- Open the Settings page on your Meta Quest 3S.
- Scroll to find the Quest Link option.
- Enable Quest Link by toggling the switch to the right.
- You can now connect your Meta Quest 3S to your PC either using a USB cable or Air Link (for wireless connection).
- Note:
- To use Air Link, make sure both your Meta Quest 3S and PC are on the same Wi-Fi network.
With Quest Link enabled you can access a whole new world of content, including VR games, media, and other experiences from your PC directly in your headset. (18 Beginner Tricks for the Meta Quest 3S)
12. How to Backup Your Apps or Games?
It’s important to keep your apps and games safe in case anything goes wrong. The Backup feature in the settings allows you to save your apps and game data:
- Backing Up Your Apps/Games:
- Go to the Settings page on your Meta Quest 3S.
- Find the Backup tab in the list of options.
- From here, you can choose to back up your apps and games, ensuring that your data is safe and recoverable.
Backing up your data is a great way to ensure that you don’t lose any progress in your games or important VR experiences. It’s always a good idea to back up your device regularly.
13. Enable Seamless Multitasking, WiFi QR Code, and Use Apps While Lying Down
Meta Quest 3S lets you do more than one thing at a time, whether it’s listening to music while playing a game or connecting to Wi-Fi with a QR code. Plus, if you enjoy lounging in bed while using your VR headset, there’s an option for that too. Here’s how to enable these multitasking features:

- Seamless Multitasking:
- Go to Settings and find the Experimental tab.
- Enable Seamless Multitasking.
- With this option on, you can listen to music on YouTube while playing a game at the same time, making your VR experience more immersive and productive.
- Wi-Fi QR Code Option:
- In the Experimental tab, enable the ‘Enable Wi-Fi QR Code’ option.
- Now, just like on your phone, you can connect to Wi-Fi using a QR code, making the process quicker and more convenient.
- Use Apps While Lying Down:
- Still, in the Experimental tab, turn on the ‘Use Apps While Lying Down’ option.
- With this setting enabled, you can comfortably enjoy apps, watch videos, or use media while lying down in your bed.
These features make the Quest 3S even more flexible and adaptable to your lifestyle, offering a smoother and more personalized experience.
14. How to Enable Hand-Tracking in Meta Quest 3S?
Hand-tracking is a fun and futuristic feature that lets you control your VR experience using your hands instead of controllers. Here’s how to enable it:
- Step-by-Step Instructions:
- Open Settings on your MQ3S.
- Go to Headset Tracking.
- Enable Headset Tracking first, then go to Hand Tracking.
- Enable Hand and Body Tracking.
- To switch to hand-tracking mode, double-tap the triggers on your controllers.
Once enabled, your hands will be tracked in the VR space, allowing you to interact with apps, games, and objects without the need for controllers. This provides a more natural and immersive experience in virtual reality!
15. How to Share Games on Meta Quest 3S?
If you want to let your friends or family try out games on your MQ3S, but don’t want them using your account, you can easily share games with them. Here’s how:
- Step-by-Step Instructions:
- Go to Settings on your Quest 3S.
- Select Accounts from the menu.
- Add the account of the person you want to share games with.
Note: Only the host (device owner) can manage accounts and share games on the headset.
This feature allows you to share your VR games with others, so they can enjoy your content without needing to log into your account, keeping things simple and secure.
16. How to Enable Travel Mode?
Traveling with your Meta Quest 3S is easy, but sometimes the motion of the vehicle can make apps or games unstable. Enabling Travel Mode will help keep everything smooth and stable while you’re on the go. Here’s how to enable it:
- Step-by-Step Instructions:
- Open the Settings menu on your Meta Quest 3S.
- Look for Travel Mode and enable it.
When enabled, Travel Mode keeps your apps and games more stable while you’re travelling in a moving vehicle. It’s perfect for long trips or playing while on the go! (18 Beginner Tricks for the Meta Quest 3S)
17. How to Cast Your VR Screen to a Mobile Device or TV?
Want to share your VR experience with others by casting your Meta Quest 3S screen on your mobile device or even a TV? It’s super easy. Here’s how:
- Casting to Your Mobile:
- Download and install the Meta Horizon Mobile App on your smartphone.
- Open the app, and you’ll see an icon of a VR headset with a Wi-Fi symbol.
- Tap this icon, and if both your headset and mobile are connected to the same Wi-Fi network, your VR screen will cast directly to your phone.
- Casting to a TV:
- In the Meta Horizon app, go to the ‘Mirror to Device’ option.
- Open your mobile control centre, select ‘Screen Mirroring’, and choose the device you want to cast to.
- Your VR screen will now appear on the selected TV or device.
- Alternative Method (Without the App):
- Open the Gallery app on your Quest 3S.
- Select the Camera app and tap the ‘Cast’ option in the top-left corner.
- Select the ‘Computer’ option from the list.
- A URL will appear on your screen. Copy this URL and paste it into a web browser on your computer to start casting.
These casting options let you share your VR world with others, creating an interactive viewing experience for everyone to enjoy.
18. How to Share Your VR Screen on Other Devices?
Want to show off your VR screen on another device, like your computer? It’s quick and easy to do without needing any extra apps. Follow these steps to share your screen:
- Step-by-Step Instructions:
- Open the Gallery app on your Meta Quest 3S.
- Click on the Camera app, then tap the ‘Cast’ option in the top-left corner.
- Select ‘Computer’ from the list of options.
- A URL will pop up on your VR screen. Copy this URL and paste it into the browser of the device you want to cast it.
This feature is perfect for casting to devices like PCs, laptops, or smart TVs, so you can share your VR screen with friends, family, or audiences.
Conclusion
With these tricks for the Meta Quest 3S, you’re now equipped to take full advantage of everything this amazing VR headset has to offer. From seamless multitasking and hand-tracking to casting your VR screen on a mobile device, these features will help you enhance your virtual reality experience.
By exploring all these settings and features, you can customize your Quest 3S to suit your needs, whether you’re relaxing in bed, travelling, or sharing your VR world with others. We hope these tricks help you get the most out of your MQ3S! (18 Beginner Tricks for the Meta Quest 3S)
Enjoy exploring the world of VR, and happy gaming!
Feel free to revisit these tips whenever you need them, and don’t hesitate to explore even more features to keep your VR journey exciting and fresh.
FAQ: 18 Beginner Tricks for the Meta Quest 3S
Q: What can you do with Meta Quest 3S?
A: You can play immersive VR games, explore virtual worlds, attend virtual meetings, work out, and even learn new skills.
Q: Why is Meta Quest 3S so cheap?
A: Meta keeps the price competitive by subsidizing hardware costs, and focusing on software and ecosystem monetization.
Q: Can you watch movies on Meta Quest 3S?
A: Yes, you can watch movies in VR on a browser like Netflix, Prime Video, or through a virtual cinema experience.